 Browser View to preview the calculator. Press the OK button to close Wintempla.
Haga clic en
Browser View para examinar la vista previa de la calculadora. Presione el botón de OK para cerrar Wintempla.| Tip |
| You must read all previous sections before reading this section. Usted debe leer todas las secciones previas antes de leer esa sección. |
Public Web Site |
| It is a web site that does not require users to provide a username and a password to access the services offered by the site. Therefore, Anonymous Access is necessary for this type of web sites, and a Windows account is necessary to run the web site. Es un sitio web que no requiere que el usuario proporcione un username y un password para accesar a los servicios ofrecidos por el sitio. Por lo tanto, Acceso Anónimo es necesario para este tipo de sitios web, y una cuenta de Windows es necesaria para ejecutar el sitio web. |
| Tip |
| IMPORTANT: when creating a Web application using Wintempla, you need to edit the default Web page (index.h or index.cpp) before debugging or running the project for the first time. IMPORTANTE: Cuando cree una aplicación Web usando Wintempla, usted necesita editar la página Web de defecto (index.h o index.cpp) antes de depurar o ejecutar el proyecto por vez primera. |
| Problem 1 |
| Create a Wintempla IIS Web Application called Calculator to add two numbers. From Microsoft Visual Studio select: Wintempla > IIS Web Application. Cree una (IIS) Aplicación Web de Wintempla llamada Calculator para sumar dos números. Desde Microsoft Visual Studio seleccione: Wintempla > IIS Web Application. |
| Step A |
| Once the project has been created open Wintempla to edit the index.cpp file. Insert three textboxes and a button as shown. Una vez que el projecto ha sido creado abra Wintempla para editar el archivo index.cpp. Inserte tres cajas de texto y un botón como se muestra. |

| Step B |
| Click theBrowser View to preview the calculator. Press the OK button to close Wintempla. Haga clic en Browser View para examinar la vista previa de la calculadora. Presione el botón de OK para cerrar Wintempla. |
| Step C |
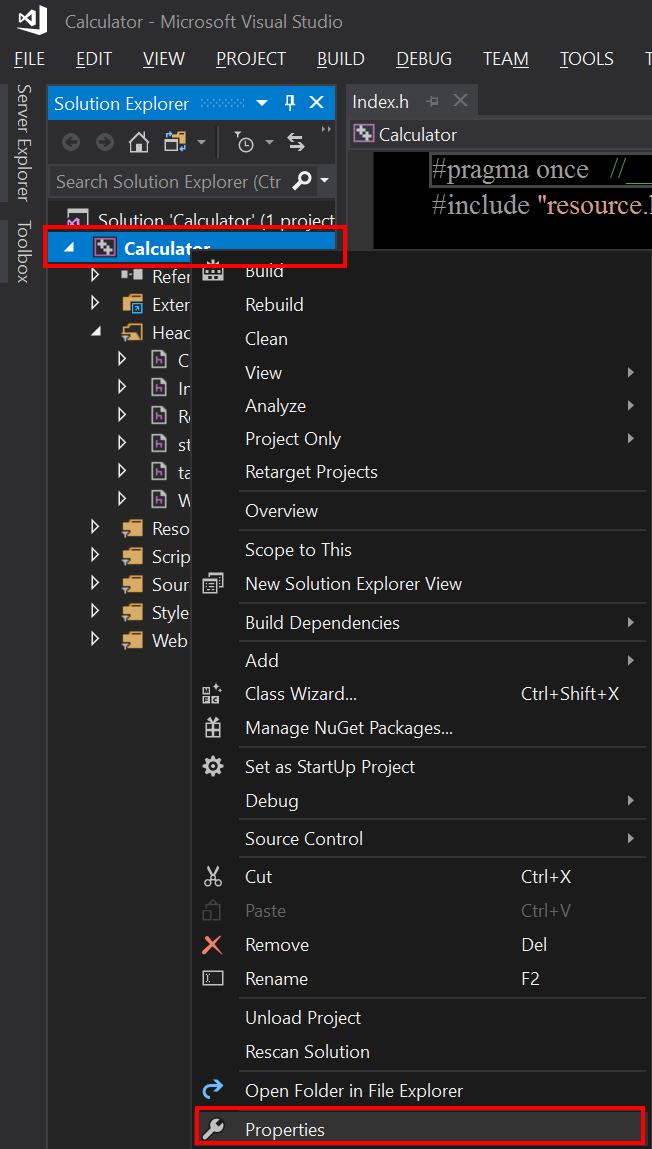
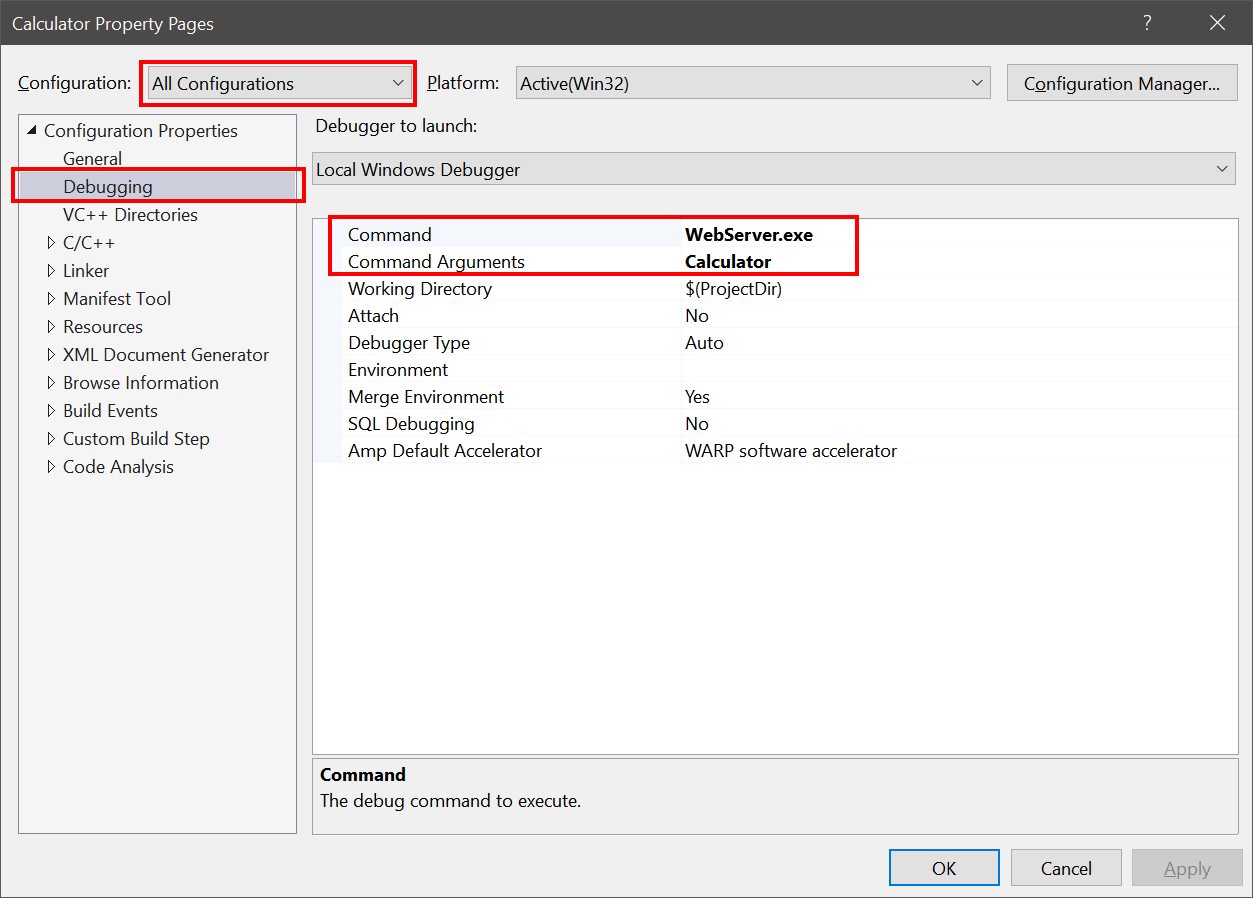
| Using the Solution Explorer, select your project and "right click" with the mouse to open the context menu, then, click on Properties. Finally, edit the project properties as shown. Observe that the Calculator project is a DLL, and it requires an executable to run (in this case Webserver.exe). Usando el Explorador de Soluciones, seleccione su proyecto y haga clic derecho con el ratón para abrir el menú de contexto, entonces, haga clic en Propiedades. Finalmente, edite las propiedades del proyecto como se muestra. Observe que el proyecto de la Calculadora es una DLL, y este requiere de un ejecutable para correr (en este caso Webserver.exe). |
| Step D |
| Edit the index.cpp file as shown. When done, run the application. Be sure to run the Application in 32 bits using Build > Configuration Manager . Note that if you will be using this DLL in a 64 bits Web Server, you must compile the DLL for 64 bits in the Release mode. Edite el archivo index.cpp como se muestra. Cuando termine, corra la aplicación. Asegúrese de ejecutar la aplicación usando 32 bits Build > Configuration Manager . Note que si usted usará esta DLL en un servidor de 64 bits, usted tendrá que compilar la DLL para 64 bits en el modo de Release. |
| Calculator.cpp |
| #include "stdafx.h" //_____________________________________________ Index.cpp #include "Index.h" void Index::Window_Open(Web::HttpConnector& h) { } void Index::btCalculate_onclick(Web::HttpConnector& h) { const double x = tbxX.DoubleValue; const double y = tbxY.DoubleValue; tbxResult.DoubleValue = x + y; } |
| Tip |
| When a Web applications runs, Microsoft Visual Studio starts a Web server for testing the application. After starting the web server, the default Internet browser (Internet Explorer, Google Chrome, Safari, ...) is used to test the Web application. WARNING: some antivirus software detects WebServer.exe as a threat and delete the file. You must setup your antivirus software appropriately to avoid deleting the file WebServer.exe. For instance, you may add the Microsoft Visual Studio project folder to the list of exceptions in your antivirus software. Cuando una aplicación Web corre, Microsoft Visual Studio inicia un servidor web para probar la aplicación. Después de iniciar el servidor web, también se usa el explorador de Internet por defecto (Internet Explorer, Google Chrome, Safari, ...) para probar la aplicación Web. WARNING:algunos programas antivirus detectan WebServer.exe como una amenaza y borran el archivo. Usted debe configurar su programa antivirus en forma apropiada para evitar que se elimine el archivo WebServer.exe. Por ejemplo, usted puede agregar la carpeta de proyectos de Microsoft Visual Studio a la lista de excepciones de su programa antivirus. |
| Step E |
| In Microsoft Visual Studio Build > Configuration Manager change the configuration from Debug to Release. Run the application to test the release version. The Calculator.dll file will be generated in the Release folder of the project. En Microsoft Visual Studio Build > Configuration Manager cambie la configuración de Debug a Release. Ejecute la aplicación para probar la versión de Release. El archivo Calculator.dll será generado en la carpeta de Release del proyecto. |
| Problem 2 |
| Create a folder in the web server to host the web application. Then, copy the application files from your computer to the web server. DO NOT use a Debug DLL in Microsoft IIS. Cree una carpeta en el servidor web para hospedar su aplicación web. Entonces, copie los archivos de la aplicación desde su computadora al servidor web. NO USE una DLL del tipo Debug en Microsoft IIS. |
| Step A |
| In the web server, use Windows explorer to locate the folder: C:\inetput\wwwroot. Then create the folder Calculator inside C:\inetput\wwwroot. En el servidor web, use el explorador de Windows para ubicar la carpeta: C:\inetput\wwwroot. Entonces cree la carpeta Calculator dentro de C:\inetput\wwwroot. |

| Step B |
| Copy the Calculator.dll file from the Release folder to C:\inetput\wwwroot\Calculator. Additionally, copy all files (Javascript, CSS, jpg, png, etc.) of your application creating sub-folder if necessary. In this case, copy at least the files: cyan.css, Wintempla.js, Index.js and WebSiteIcon.png, from the project folder. You may replace the image WebSiteIcon.png with the logo of your company. Copie el archivo Calculator.dll desde la carpeta de Release a C:\inetput\wwwroot\Calculator. Copie los archivos respectivos (Javascript, CSS, jpg, png, etc.) de su aplicación creando sub-carpetas si es necesario. En este caso, copie al menos los archivos: cyan.css, Wintempla.js, Index.js and WebSiteIcon.png, desde la carpeta del proyecto. Usted puede reemplazar la imagen WebSiteIcon.png con el logo de su compañía. |
| Problem 3 |
| Setup ISAPI and CGI restrictions. Configure las resctrictiones de ISAPI y de CGI. |
| Step A |
| Open IIS Manager which is located in Control Panel > Administrative Tools. Select the web server on the left panel, and then double click on ISAPI and CGI Restrictions. Abra el administrador de IIS el cual está ubicado en Control Panel > Administrative Tools. Seleccione el servidor web en el panel de la izquierda, y entonces haga doble clic en ISAPI and CGI Restrictions. |
| Step B |
| Click on Add located on the right panel. Then edit the restriction as shown. When ready, press OK. Haga clic en Add ubicada en el panel de la derecha. Entonces edite la restricción como se muestra. Cuando esté listo, presione OK. |
| Problem 4 |
| Setup the Authentication of your web application. Configure el Acceso de su aplicación web. |
| Step A |
| Open IIS Manager which is located in Control Panel > Administrative Tools. Select the Calculator folder on the left panel, and then double click on Authentication. Be sure Anonymous Authentication is enabled, while Basic Authentication is disabled. Abra el administrador de IIS el cual está ubicado en Control Panel > Administrative Tools. Seleccione la carpeta Calculator en el panel de la izquierda, y entonces haga doble clic en Authentication. Asegúrese de que Anonymous Authetication esté habilidada, mientras que Basic Authentication este deshabilitada. |
| Step B |
| Select the Calculator folder on the left panel, and then double click on Authentication. Select Anonymous Authentication, and then click Edit located on the right panel of IIS Manager. Select Application Pool Identity as shown. When ready, press OK. Seleccione la carpeta de Calculator en el panel de la izquierda, y entonces haga doble clic en Authentication. Seleccione Anonymous Authentication, y entonces haga clic en Edit localizado en el panel en la derecha de IIS Manager. Seleccione la Application Pool Identity como se muestra. Cuando esté listo, presione OK. |
| Problem 5 |
Test the web application:
Pruebe la aplicación web:
|
| Tip |
| If your application does not run when installed on Microsoft IIS, and you get a response with an HTTP code with a value of 404 Not Found, this implies that the dll of your application requires another library. Si su aplicación no corre cuando se instala en Microsoft IIS, y usted obtiene una Respuesta de HTTP con código con un valor de 404 Not Found, esto implica que la dll de su aplicación requiere de otra liberaría. |
| Problem 6 |
| Make the URL easy to remember. Create a file called index.htm with the content shown below, and place it in C:\inetpub\wwwroot\Calculator. Then test the following URL http://localhost/Calculator, it should redirect to the other URL. Be sure to write the meta tag exactly as shown. Haga el URL fácil de recordar. Cree un archivo llamado index.htm con el contenido mostrado debajo, y colóquelo en C:\inetpub\wwwroot\Calculator. Entonces pruebe el siguiente URL http://localhost/Calculator, este debe re-direccionar al otro URL. Asegúrese de escribir la etiqueta meta exactamente como se muestra. |
| Tip |
You can test this website from other computer or from your smart phone, by setting up your computer as a Hot Spot:
Usted puede probar este sitio web desde otra computadora o desde su smart phone, configurando su computadora como un Hot Spot:
|